PolyPlay Player Live Workflow
How to use PolyPlay for multilingual live streaming
When using the PolyPlay Player for live streaming, always keep in mind that the links you use to configure the PolyPlay multilingual player will depend on your content distribution network choice, such as YouTube Live, Vimeo, Brightcove, etc.
If required, PolyPlay can help you secure accounts and then configure them on all major Content Distribution Networks. Simply let us know. By default, PolyPlay recommends Vimeo.
Need A/V help for multilingual streaming? Contact us.
Workflow example
To illustrate this workflow, we will be using the following use case:
- One live event
- Four languages
- One PolyPlay video player through which the audience can select a listening language
For this event, we will assume that interpreters are remotely accessing via a platform such as Interactio, Goqonda, Kudo, Interprefy, Voiceboxer, Speakus, Verspeak, Zoom, or similar. In a physical, in-person environment, your A/V would have one audio output for each language broadcasting from the interpreter booths ready to be channeled.
Streaming connectivity diagram
To start with the streaming workflow, let’s take a look at the following diagram highlighting the different elements and how these elements combine into the final PolyPlay multilingual player shown to your audience.

Live multilingual streaming workflow walkthrough
Step 1 - Main production output
PGM + Floor Audio : Your A/V team (on-site or remote) produces the video output for your live stream. This output contains a master audio mix from the floor, broadcast in the original language spoken by each speaker and an original soundtrack from music played. This output could also be pre-recorded video content being pushed to the stage.

Step 2 - Managing interpreters and language pairs/outputs
Interpreters : Interpreters work with your floor audio, and in cases of complex language scenarios then English is used as an intermediary language. Whether on-site or remote, your interpreters can see and hear what each speaker is saying in their original language (the floor). Each interpreter has a language pair assigned to them (individually or as a group of interpreters taking relays). The result is you get a clean single language audio channel for each language.
Note that you get the same result for this step whether you have on-site interpreters managed by your A/V supplier, or when working remotely. There is virtually no difference.

Step 3 - Configure language streams
PGM + Language X : This is the final and crucial step of the process for hosting a multilingual live stream event. Your A/V team (or ours, if outsourced to our team), will combine the PGM video feed with each of the available language outputs. This effectively creates one video feed per language.*
*Some additional parameters can be adjusted at this step, such as auto-floor audio pass-through when there is no interpretation, auto-audio ducking, etc. For simplicity’s sake, we won’t discuss these settings.
Tech talk : This step can be easily handled by a single OBS instance for each language, on-site or remote. That same OBS can handle recording and streaming to the destination as per the next step, Step 4.

Step 4 - Configure and stream to a content distribution network
Vimeo X : Now that you have a video feed for each language, you can stream these feeds to individual streaming ingests (on Vimeo, or any other streaming platform).
In general, you will stream through RTMP once for each language.
Streaming to platforms such as Vimeo or YouTube allows you to stream to an unlimited audience size (yes, millions of viewers worldwide) in full HD, with no bandwidth charges, complex setups, or limitations. Using these providers, you will leverage a first class global service – for free on YouTube, or for a small annual fee with Vimeo.
Important: this will require at least 4.5mb/s (for 1080P stream) upload bandwidth for each language feed. If this is a limitation because of location restrictions, location costs, or problems with second-tier A/V studios, then simply contact us as we have solutions to deal with these particular use cases.
Step 5 - Configure the PolyPlay multilingual stream player
PolyPlay player : The final step is assembling these streams in the PolyPlay stream player. To configure this, you will need the embedded URLs for each live stream (each language).
- On vimeo the URL looks like this (make sure to take the event embed link) : https://vimeo.com/event/679971/embed/272b571a05
- On YouTube it’s a regular YouTube URL : https://www.youtube.com/watch?v=5qap5aO4i9A
When purchasing a live multilingual stream player from us, you will be asked to fill in the URL of the players assigned for each language.
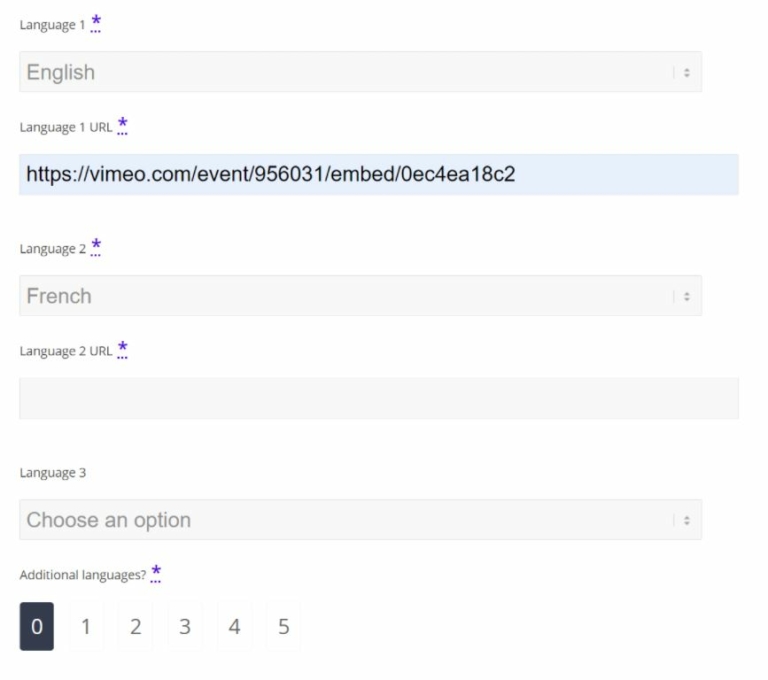
So that finally, when a viewer selects a language in the PolyPlay web player, it will switch to the correct language.
Note: On purchase, your player will immediately be configured with the links you’ve entered and the player will be operational for testing. A “PREVIEW” message will show on top of the player until the date prior to the event, allowing free of charge testing.